Python GUI - Quick Introduction to Tk (tkinter)
Tk is a tool for developing cross-platform desktop applications, that is, native applications with a graphical user interface (GUI) for Windows, Linux, Mac and other operating systems. Technically, Tk is an open source library written in C and originally developed for the Tcl programming language. Hence we usually refer to it as Tcl/Tk. Since its first versions, the Python standard library has included the tkinter module, which allows you to interact with Tk to write desktop applications in Python. Tk's learning curve is relatively small compared to other libraries in the field (like Qt), so any programmer with a minimal background in Python can quickly start building professional GUI applications and distribute them by using packaging tools like cx_Freeze or PyInstaller, which integrate very well with Tk.
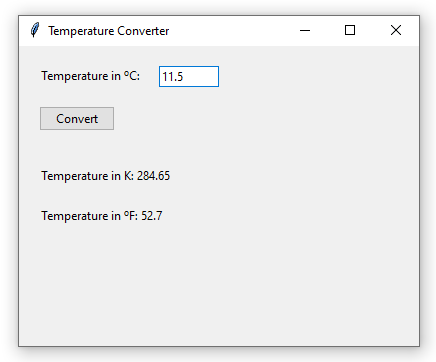
We have a large collection of Tk-related posts under the tkinter tag, which cover a significant part of the library. But since all those articles assume a minimum knowledge regarding how Tk and desktop applications in general work, we decided to write this post as a starting point to learn the basics. We will create a small application that allows the user to convert a temperature value expressed in degrees Celsius to Kelvin and Fahrenheit, as illustrated in the following image.
To get started, the first step for every Tk application is to import the proper modules:
We import the main module tkinter abbreviated as tk (a common convention among Python programmers) and the ttk module, which lies inside the tkinter package. We will be using objects from both modules. The ttk module was included in recent versions of Tk. You will find out that some classes are provided by both the tk and the ttk modules. Whenever possible, choose ttk, since it has a modern look and better styling system.
The second fundamental step is to create the main window. Every Tk application will have a main window, and eventually some other child windows (see how to Create a New Window in Tk (tkinter).)
In the first line we create an instance of Tk, which is responsible for creating the main window and internally starting a Tcl and Tk interpreter (that explains the class name). Indeed, it would be clearer if the name were tk.MainWindow or something similar. For didactic purposes we have called the instance in question window, but the convention that Tk programmers usually follow is to name it root.
The second line executes the mainloop() method, which runs the application main loop. Every desktop application (in Tk or in any other similar tool) works with a main loop that waits for and handles events in the GUI. For this reason, it does not return until the last window of our application has been closed. This is an important fact to keep in mind whenever we manage to place code below the call to mainloop(). Typically, window.mainloop() will be the last line of our code.
Now we are going to give the window a title and a size via the window's title() and config() methods.
|
window = tk.Tk()
|
|
window.title("Temperature Converter")
|
|
# Initial size: 400x300 px.
|
|
window.config(width=400, height=300)
|
|
window.mainloop()
|
Whenever we need to pass a size to a Tk function or class, that will be made via the width and height parameters, measured in pixels. In this case our window will be initialized with a 400px width and a 300px height.
Once the window has been configured, we must start filling it with buttons, textboxes, labels, menus, checkboxes, etc. Each of these components that we can include in our interface and with which the user can interact is known as widget. Tk provides many different types of widgets. In general terms we can say that there are two ways to organize the code related to the creation of widgets: object-oriented and not object-oriented. Using object orientation is often useful for larger applications with complex user interfaces. For small and medium applications, not bloating the code with object orientation is usually pertinent. In what follows we will present each block of code in its two versions.
Let's start by displaying a message in the window telling the user to enter the temperature in Celsius, for which we can use a widget called label. The label is represented in Tk by the ttk.Label class.
To put a widget in the interface, we must first create an instance of the proper class (ttk.Label, in this case), assign it to a variable (temp_celsius_label), and place it somewhere in the window via the place() method. This method requires us to pass the widget location in the window by specifying the position in the X and Y coordinates. We can optionally pass the width and height arguments to give the widget a fixed size, otherwise Tk provides a default size that fits the text. For a detailed explanation of place() and the other methods for placing widgets in Tk, see Placing Widgets in Tk (tkinter).
Below the label creation, let's add a textbox for entering the temperature, and a button for carrying out the conversion. Textboxes and buttons are represented by the ttk.Entry and ttk.Button classes.
As you can see, the logic is pretty simple, and always the same: first create the widget, then place it somewhere in the window. The ttk.Entry class does not take a text argument since the user is expected to write something therein.
Regarding the design of the interface, it only remains to add the two labels where the results of the conversion (the values in Kelvin and degrees Fahrenheit) will be displayed. Let's create them:
So far the window design. Now we must make sure that when the button is pressed, our program converts the temperature entered in the textbox. To do so, we must create a function and link it with the convert_button via the command argument. Then, inside the function we will get the content of the textbox via the get() method, and output the result of the conversion to the temp_kelvin_label and temp_fahrenheit_label widgets via the config() method.
Excellent! The convert_temp() function will be called by Tk every time the user presses the convert_button. For more details on how buttons work, see Button in Tk (tkinter). We needed to convert the content of the textbox to a floating point number via the float() built-in function since get() always returns a string (str). More about textboxes in this post: Textbox (Entry) in Tk (tkinter).
Here then is a small desktop application written with Python and Tk and its main concepts: window, widgets, main loop, etc. You can now head over to some of our posts on the various Tk widgets by visiting the tkinter tag page.