Menubar in Tk (tkinter)

The tk.Menu widget allows you to add a menubar to the main window (tk.Tk) or to a child window (tk.Toplevel) in a Tk desktop application. Window menus contain text and/or an image and can be linked with functions in order to respond to user clicks.

/images/menubar-in-tk-tkinter/tkinter-window-with-menubar.gif

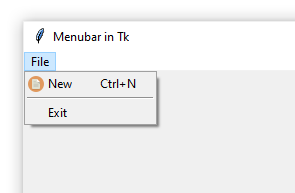
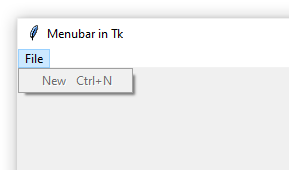
This image shows a menubar in the main window, a menu with the "File" title and a button within this menu with the "New" text, the "Ctrl+N" shortcut and an icon image. To implement a likewise feature, you need to create a menubar via the tk.Menu class and insert it in the main window:

import tkinter as tk
root = tk.Tk()
root.title("Menubar in Tk")
root.geometry("400x300")
# Create a menubar.
menubar = tk.Menu()
# Insert the menubar in the main window.
root.config(menu=menubar)
root.mainloop()

An empty menubar isn't much use: it doesn't even show up in the window. Let's add a first menu to it, with the “File” title, as it usually appears in many desktop applications.

import tkinter as tk
root = tk.Tk()
root.title("Menubar in Tk")
root.geometry("400x300")
menubar = tk.Menu()
# Create the first menu.
file_menu = tk.Menu(menubar, tearoff=False)
# Append the menu to the menubar.
menubar.add_cascade(menu=file_menu, label="File")
root.config(menu=menubar)
root.mainloop()

Each menu that we want to place in the menubar is also created using the tk.Menu class. So now we have two instances: menubar, the container for all the window's menus, and file_menu, the menu to which we'll add some buttons right away. To add menus to a menubar, use the add_cascade() method, which receives as arguments the menu (menu) to be inserted and the text (label) to display.

Note that in the creation of the file_menu (line 8) we pass as the first argument the menubar within which we want to place it. The second argument tearoff=False prevents Tk from letting the user undock the window menu. This is a strange feature rarely needed and not appreciated by users, which is why we disabled it. If you're interested in seeing what it's all about, try starting the menu with the default value tearoff=True.

Now we can see our menubar with a single File menu, although without buttons. To add a button or option to a menu use the add_command() method.

import tkinter as tk
def new_file_clicked():
    print("The New File menu was clicked!")
root = tk.Tk()
root.title("Menubar in Tk")
root.geometry("400x300")
menubar = tk.Menu()
file_menu = tk.Menu(menubar, tearoff=False)
file_menu.add_command(
    label="New",
    accelerator="Ctrl+N",
    command=new_file_clicked
)
menubar.add_cascade(menu=file_menu, label="File")
root.config(menu=menubar)
root.mainloop()

Here we insert into our menu a button with the “New” text (label argument) and a “Ctrl+N” keyboard shortcut indicator (accelerator). The command argument works in the same way as it does in buttons. It receives the name of a function that will be called when the user clicks on that menu option.

The accelerator parameter simply displays the keyboard shortcut. In order for the menu to be effectively activated by the shortcut, the proper event must be associated to the window and all its child widgets:

import tkinter as tk
def new_file_clicked(event=None):
    print("The New File menu was clicked!")
root = tk.Tk()
root.title("Menubar in Tk")
root.geometry("400x300")
menubar = tk.Menu()
file_menu = tk.Menu(menubar, tearoff=False)
file_menu.add_command(
    label="New",
    accelerator="Ctrl+N",
    command=new_file_clicked
)
# Bind the CTRL+N shortcut to the `new_file_clicked()` function.
root.bind_all("<Control-n>", new_file_clicked)
# Make sure the shortcut works when CapsLock is on.
root.bind_all("<Control-N>", new_file_clicked)
menubar.add_cascade(menu=file_menu, label="File")
root.config(menu=menubar)
root.mainloop()

In addition to a text, a menu button can have an image. The configuration works in a similar way to images on buttons. An instance of tk.PhotoImage is created with the name of the file and then passed as an argument to the add_command() method. The compound argument specifies where the image should appear in relation to the text.

import tkinter as tk
def new_file_clicked(event=None):
    print("The New File menu was clicked!")
root = tk.Tk()
root.title("Menubar in Tk")
root.geometry("400x300")
menubar = tk.Menu()
file_menu = tk.Menu(menubar, tearoff=False)
new_file_img = tk.PhotoImage(file="new_file.png")
file_menu.add_command(
    label="New",
    accelerator="Ctrl+N",
    command=new_file_clicked,
    image=new_file_img,
    # The image must be placed to the left of the text.
    compound=tk.LEFT
)
root.bind_all("<Control-n>", new_file_clicked)
root.bind_all("<Control-N>", new_file_clicked)
menubar.add_cascade(menu=file_menu, label="File")
root.config(menu=menubar)
root.mainloop()

Other possible values for compound are tk.TOP, tk.BOTTOM, and tk.RIGHT. You can download the new_file.png image from this link. Make sure to put it in the application directory or the working directory.

Now, surely a menu will have more than one button, so we can call add_command() as many times as necessary. The options of a menu appear in the interface in the same order in which they were added in the code. Let's add a new button to the file_menu to close the program.

import tkinter as tk
def new_file_clicked(event=None):
    print("The New File menu was clicked!")
root = tk.Tk()
root.title("Menubar in Tk")
root.geometry("400x300")
menubar = tk.Menu()
file_menu = tk.Menu(menubar, tearoff=False)
new_file_img = tk.PhotoImage(file="new_file.png")
file_menu.add_command(
    label="New",
    accelerator="Ctrl+N",
    command=new_file_clicked,
    image=new_file_img,
    compound=tk.LEFT
)
root.bind_all("<Control-n>", new_file_clicked)
root.bind_all("<Control-N>", new_file_clicked)
file_menu.add_separator()
file_menu.add_command(label="Exit", command=root.destroy)
menubar.add_cascade(menu=file_menu, label="File")
root.config(menu=menubar)
root.mainloop()

The add_separator() method introduces a horizontal line that is useful for separating groups of related menu buttons.

/images/menubar-in-tk-tkinter/tkinter-window-with-two-menu-buttons.png

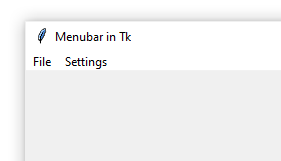
Similarly, successive calls to add_cascade() add other menus to the menubar. The following code adds a second menu with the "Settings" title.

import tkinter as tk
def new_file_clicked(event=None):
    print("The New File menu was clicked!")
root = tk.Tk()
root.title("Menubar in Tk")
root.geometry("400x300")
menubar = tk.Menu()
file_menu = tk.Menu(menubar, tearoff=False)
new_file_img = tk.PhotoImage(file="new_file.png")
file_menu.add_command(
    label="New",
    accelerator="Ctrl+N",
    command=new_file_clicked,
    image=new_file_img,
    compound=tk.LEFT
)
root.bind_all("<Control-n>", new_file_clicked)
root.bind_all("<Control-N>", new_file_clicked)
file_menu.add_separator()
file_menu.add_command(label="Exit", command=root.destroy)
settings_menu = tk.Menu(menubar, tearoff=False)
menubar.add_cascade(menu=file_menu, label="File")
menubar.add_cascade(menu=settings_menu, label="Settings")
root.config(menu=menubar)
root.mainloop()
/images/menubar-in-tk-tkinter/tkinter-window-with-settings-menu.png

A menu can contain normal buttons, like the ones we just used for the "New" and "Exit" options, or checkbox buttons. Checkbox buttons work in a similar to the ttk.Checkbutton widget. They behave the same as normal buttons, but also have a boolean value that is changed whenever the user clicks on them. This boolean value is represented by the presence of a check mark to the left of the button text.

/images/menubar-in-tk-tkinter/tkinter-menu-checkbutton.gif

The image shows the button with the "Run at Startup" checkbox that indicates, in a hypothetical application, whether the program should be started with the system (for a real implementation of this feature on Windows see Run Python Application at Startup on Windows.) The user can enable or disable that option through the settings menu. The function bound to this button is called every time the user changes the option. Here is the code:

import tkinter as tk
def new_file_clicked(event=None):
    print("The New File menu was clicked!")
def run_at_startup_clicked():
    if run_at_startup.get():
        print("Menu checked (run at stratup.)")
    else:
        print("Menu unchecked (do not run at startup.)")
root = tk.Tk()
root.title("Menubar in Tk")
root.geometry("400x300")
menubar = tk.Menu()
file_menu = tk.Menu(menubar, tearoff=False)
new_file_img = tk.PhotoImage(file="new_file.png")
file_menu.add_command(
    label="New",
    accelerator="Ctrl+N",
    command=new_file_clicked,
    image=new_file_img,
    compound=tk.LEFT
)
root.bind_all("<Control-n>", new_file_clicked)
root.bind_all("<Control-N>", new_file_clicked)
file_menu.add_separator()
file_menu.add_command(label="Exit", command=root.destroy)
settings_menu = tk.Menu(menubar, tearoff=False)
run_at_startup = tk.BooleanVar()
settings_menu.add_checkbutton(
    label="Run at Startup",
    command=run_at_startup_clicked,
    variable=run_at_startup
)
menubar.add_cascade(menu=file_menu, label="File")
menubar.add_cascade(menu=settings_menu, label="Settings")
root.config(menu=menubar)
root.mainloop()

As seen in line 31, to create a checkbox button within a menu, use add_checkbutton() instead of add_command(). This method requires a Tk boolean variable created via the tk.BooleanVar() class (lines 30 and 34). Each time the user presses the button, Tk changes the boolean value of the run_at_startup instance and also calls the run_at_startup_clicked() function. The boolean value of run_at_startup can be read or set via code via the get() (as in line 7) and set() methods.

This same logic is found in the add_radiobutton() method, used to add several buttons with a checkbox inside a menu, but which are related to each other in such a way that when one of them is activated, the rest is disabled. For example, if we want to allow the user to choose through the menus of our application the color of the UI between the "Light" and "Dark" options, it would be convenient to use a couple of radio buttons:

import tkinter as tk
def new_file_clicked(event=None):
    print("The New File menu was clicked!")
def run_at_startup_clicked():
    if run_at_startup.get():
        print("Menu checked (run at stratup.)")
    else:
        print("Menu unchecked (do not run at startup.)")
def theme_changed():
    theme_value = theme.get()
    if theme_value == 1:
        print("Light theme selected.")
    elif theme_value == 2:
        print("Dark theme selected.")
root = tk.Tk()
root.title("Menubar in Tk")
root.geometry("400x300")
menubar = tk.Menu()
file_menu = tk.Menu(menubar, tearoff=False)
new_file_img = tk.PhotoImage(file="new_file.png")
file_menu.add_command(
    label="New",
    accelerator="Ctrl+N",
    command=new_file_clicked,
    image=new_file_img,
    compound=tk.LEFT
)
root.bind_all("<Control-n>", new_file_clicked)
root.bind_all("<Control-N>", new_file_clicked)
file_menu.add_separator()
file_menu.add_command(label="Exit", command=root.destroy)
settings_menu = tk.Menu(menubar, tearoff=False)
run_at_startup = tk.BooleanVar()
settings_menu.add_checkbutton(
    label="Run at Startup",
    command=run_at_startup_clicked,
    variable=run_at_startup
)
theme_menu = tk.Menu(menubar, tearoff=False)
theme = tk.IntVar()
theme.set(1)  # Default theme ("Light".)
theme_menu.add_radiobutton(
    label="Light",
    variable=theme,
    value=1,
    command=theme_changed
)
theme_menu.add_radiobutton(
    label="Dark",
    value=2,
    variable=theme,
    command=theme_changed
)
settings_menu.add_cascade(menu=theme_menu, label="Theme")
menubar.add_cascade(menu=file_menu, label="File")
menubar.add_cascade(menu=settings_menu, label="Settings")
root.config(menu=menubar)
root.mainloop()
/images/menubar-in-tk-tkinter/tkinter-menu-radiobutton.png

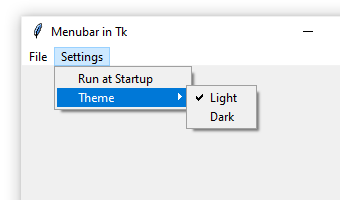
There are several things to notice in this code. First, we created a new menu called theme_menu which was itself added to the options menu via add_cascade() (lines 43 and 58). As the name itself indicates (cascade), there may be menus within other menus that are displayed in a cascading manner as shown in the image. Second, inside the theme_menu we insert two buttons via the add_radiobutton() methods, but unlike the previous option inserted with add_checkbutton(), here both options refer to the same theme` integer variable. The fact that they refer to the same variable tells Tk that these two options (although they could be more than two) are incompatible: when the user presses the "Light" button, the selection of the "Dark" theme is removed and vice versa. Finally, note that each call to add_radiobutton() includes a value argument specifying the numeric value (since it is an instance of tk.IntVar) that represents the option being added to the menu. This value will be returned by theme_menu.get() when the option is selected, as seen in the theme_menu_pressed() function.

States

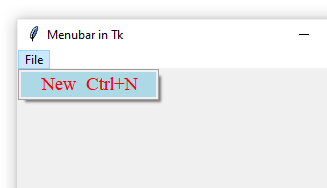
A menu button can be enabled or disabled, just like a button. When disabled, the text and image are displayed in a different color and the user cannot click on it. The add_command(), add_checkbutton(), and add_radiobutton() methods support the state argument, which specifies the state of the button.

import tkinter as tk
root = tk.Tk()
root.title("Menubar in Tk")
root.geometry("400x300")
menubar = tk.Menu()
file_menu = tk.Menu(menubar, tearoff=False)
file_menu.add_command(
    label="New",
    accelerator="Ctrl+N",
    state=tk.DISABLED
)
menubar.add_cascade(menu=file_menu, label="File")
root.config(menu=menubar)
root.mainloop()
/images/menubar-in-tk-tkinter/tkinter-disabled-menu.png

The constant tk.DISABLED indicates that the menu is disabled. The menu can be re-enabled by changing the value of state to tk.NORMAL.

# Elsewhere in the code or in response to an event.
file_menu.entryconfig(0, state=tk.NORMAL)

The entryconfig() method is used to alter any of the options passed as arguments to the three available functions for adding buttons to a menu. Each button is identified by an index, which represents its position in the menu and is passed as the first argument. Here the "New" menu has the index 0. Other options, such as label, accelerator, command, etc., can also be changed via entryconfig() anywhere in the code.

Styles

The appearance of menu buttons can be customized by passing arguments to the add_command(), add_checkbutton(), and add_radiobutton() functions. They support five properties to customize the font and colors used.

from tkinter import font
import tkinter as tk
root = tk.Tk()
root.title("Menubar in Tk")
root.geometry("400x300")
menubar = tk.Menu()
file_menu = tk.Menu(menubar, tearoff=False)
file_menu.add_command(
    label="New",
    accelerator="Ctrl+N",
    font=font.Font(family="Times", size=14),
    background="#ADD8E6",
    # Text color.
    foreground="#FF0000",
    # Background color when the button has focus.
    activebackground="#32CDFF",
    # Text color when the button has focus.
    activeforeground="#FFFF00"
)
menubar.add_cascade(menu=file_menu, label="File")
root.config(menu=menubar)
root.mainloop()
/images/menubar-in-tk-tkinter/tkinter-styled-menu.png

For a full explanation of the Font class and the options it accepts, see the Font section in our post on textboxes.

Comments