Notebook Widget (Tabs) in Tk (tkinter)
The Tk notebook widget (or tab panel) allows you to divide a part of the window into different tabs. Depending on which tab is selected, what the user views in the window changes. A paradigmatic example of this widget is the tabs in modern web browsers. The notebook widget was introduced in Tk 8.5. In Python, it is provided by the tkinter.ttk.Notebook class.
An instance of ttk.Notebook can have as many tabs as desired, and these can be removed or hidden. Each tab is identified by a text, an image, or both.
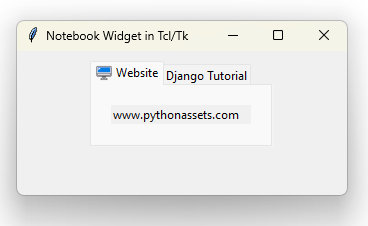
Let's start with a simple example. The following code creates a notebook widget with two tabs, one called "Website" and the other called "Django Tutorial". Each tab contains a single label (ttk.Label) with some text.
In this example, we first create the contents of the notebook widget (lines 8 and 9), then we add them with a given title using the add() method (lines 11 and 12.)
To use an image instead of text as the tab identifier, you can load an image file using tk.PhotoImage and pass it in the image parameter when adding the tab:
website_image = tk.PhotoImage(file="website.png")
notebook.add(website_label, text="Website", image=website_image, padding=20)
To maintain both text and image simultaneously, you must specify the compound argument that indicates the position of the image relative to the text. Valid options are tk.LEFT,`` tk.RIGHT``, tk.TOP, tk.BOTTOM, and tk.CENTER:
website_image = tk.PhotoImage(file="website.png")
notebook.add(
    website_label,
    text="Website",
    image=website_image,
    compound=tk.LEFT,  # Image position.
    padding=20
)
And the result is:
Another option of the notebook's add() method is underline, which indicates the position of the character to be underlined.
# Underline the first character.
notebook.add(website_label, text="Website", underline=0, padding=20)
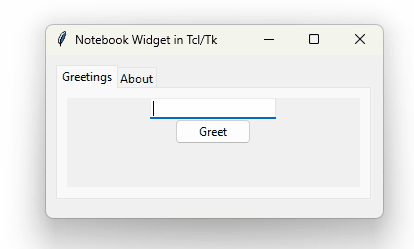
This is more than just aesthetics. The underline parameter also indicates that the tab can be selected by pressing ALT + W if shortcuts has been enabled by calling the enable_traversal() method:
# Enable tab selection via keyboard shortcuts.
notebook.enable_traversal()
# This tab will get focused when pressing CTRL + W (because W is underlined.)
notebook.add(website_label, text="Website", underline=0, padding=20)
To remove a tab from the panel, use the forget() method:
# Remove the "Website" tab.
notebook.forget(web_label)
It is also possible to remove a tab by specifying its position:
# Remove the first tab.
notebook.forget(0)
# Remove the last tab.
notebook.forget(notebook.index(tk.END) - 1)
The index() method returns the position (starting from 0) of a given tab, or the number of tabs if tk.END is passed as argument.
print(notebook.index(django_tutorial_label)) # Prints 1
Tabs can also be hidden using hide():
# Hide the "Website" tab.
notebook.hide(web_label)
# Show it again.
notebook.add(web_label)
The difference between forget() and hide() is that hiding a tab is a faster operation that remembers the tab's attributes (e.g., its image, text, margins, etc.), and thus those attributes do not need to be re-specified when restoring its visibility via add().
To insert a tab at a specific position (since add() always appends to the end), use the insert() method:
# Insert a tab at the beginning of the tab panel.
notebook.insert(0, django_tutorial_label, text="Django Tutorial")
To get the currently selected tab, you can do:
selected_tab = notebook.select()
And to get the position of the current selected tab:
selected_tab = notebook.select()
# Position of the selected tab.
notebook.index(selected_tab)
To set the selected tab, use the same function but pass a tab as argument:
# Select the "Django Tutorial" tab.
notebook.select(django_tutorial_label)
The tab() method allows you to get or set the properties of a tab:
# Prints a dictionary with the properties of the "Website" tab (text, image, etc.)
print(notebook.tab(website_label))
# Change the tab's text to "Blog".
notebook.tab(website_label, text="Blog")
The tabs() method returns a list of all tabs included in the notebook widget.
# List of tabs in the notebook widget.
tabs = notebook.tabs()
Methods that expect a tab as an argument (like forget(), hide(), index(), tab(), etc.) can alternatively receive tk.CURRENT to indicate the currently selected tab. For example:
# Prints the position and text of the selected tab.
print(notebook.index(tk.CURRENT))
print(notebook.tab(tk.CURRENT)["text"])
Notebook Events
The ttk.Notebook class provides a custom event called <<NotebookTabChanged>> which, as you might have guessed, is invoked when the tab selection changes.
def tab_changed(event: tk.Event) -> None:
    # event is an instance of tk.Event.
    print("New tab selected.")

# ...

notebook.bind("<<NotebookTabChanged>>", tab_changed)
Separating Tabs Into Classes
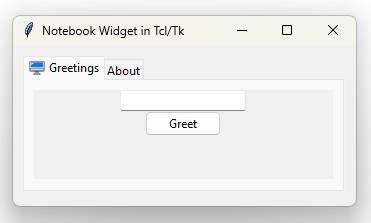
Consider the following tab panel:
While it is still a fairly simple interface, it is somewhat more complex than the minimalist example shown at the beginning. In the previous code, each tab had only one control, whereas in this small program, we have three widgets per tab and the buttons have some functionality.
To keep the code organized and readable, it is usually convenient to separate the content of each tab in classes that inherit from ttk.Frame:
Even if the content of a tab is large enough, it could be placed in a separate module and imported from the main file to be included in the UI.
Since most tabs in a real desktop application will likely contain more than one control and have certain functionality, adhering to this practice will result in more readable and maintainable code.